This is the webpage of a group whose aim is to improve the kit and clothes of a UK seventeenth century Civil War reenactment group, using the most up to date references and research. Feel free to comment on any of the subjects raised here and return often as I want to keep the discussion lively and ongoing.


Please look at the extra tabs on the right hand side. The newbie section is the place for basic kit if you're just beginning to reenact the 1640s. Haberdashery has lots of detail about colours, buttons, tapes etc.

Friday 7 November 2014

Another Montero


Recently I was commissioned to make a copy of a montero cap kept in the Musee de l'Armee in Paris. The cap to my eyes is faintly ridiculous, but it has a good provenance, though it's a reproduction and is labelled "Bouquinquan" which is apparently the French word for montero, tradition being that the cap was associated with the Duke of Buckingham and his ill fated attempts to involve England in the murky politics of France in the 1620s. Who knows? It's a good story at least.

Anyway, below is a photo of the hat in the museum. Maybe you can understand my reticence to make it?


Eventually it was agreed that I'd make a hat inspired by this example rather than an exact copy and I set about looking at pictures trying to get a handle on what was going on. What had intrigued me about this one was that the peak extended all the way around the cap, forming a kind of brim. You can see it better in the photo of the underside. If you compare it with a montero worn by Thomas Lunsford in an engraving from 1642, you can see a similar thing going on albeit in a smaller scale.

I was wondering if I'd missed something in the construction of these hats. A similar style is worn by a musketeer in a drill book published by Thomas Jenner in the same year. The brim is more pronounced, but in this picture it is obvious that it's not a continuation of the crown as I'd previously thought, but a completely separate piece, because the decoration of the two parts is different.


Here are some more french illustrations of the period that bear out the new theory.


The odd thing is that apart from the above picture bottom left, the folded skirts are so thin as to presumably be no use as protection when unfolded, though my pet theory is that these are all high class caps with decorated seams aplenty and as such probably wouldn't have been designed to be folded down at all. Especially with the wide peak/brim extending around the hat in some of these examples.

In fact, reading up on this, admittedly specialist subject, there seems to be an idea that the folded part of a montero consists of a solid rectangle of fabric, rather that than having a cut-out for the face. Julian Tilbury & Stuart Reid in  Clothing of the English Civil War Armies and Richard Duthie in ECW Notes and Queries have postulated this theory. Some pictures seem to suggest that, but on reflection this is also rather an odd idea Why would a tailor bother to make the skirts unfold-able if there was no hole? You would completely cover your face when you rolled them down. A tale of a deserter trying to sneak into Nottingham with a 'montero about his face' suggests that these caps were on occasion worn unfolded. This detail (below) from a painting by Pieter de Snayers of Troops at the Siege of Aire Sur la Lys from 1653 clearly shows a soldier with his montero unfolded, face peeking through the hole. It also indicates a front seam as you can see it's coming apart. This seam is one of the tricks that makes the tricky geometry of a montero skirt possible.


And this cap, being worn by a trooper in a poem by John Quarles published in 1658 is definitely one with enough spare to pull down. Imagine riding a horse blindfolded in a montero with no cut out for your face. Not much fun! Interestingly this one has no discernible brim which would tally up with the theory of a brim making it hard to unfold the skirts. Maybe the decorated brim is for the higher class, officers and musicians, whilst the common soldier's montero, being designed to keep you warm would have a wider skirt and a narrower brim. Until more evidence comes to light, we probably won't know for sure!


Anyway, I digress. To conclude, here are two more pics of the new style. I think the brim is a tad wide and it shuld stick out at the back, but I'm still experimenting with this new idea. The decoration by the way is welted seams and edges with flat fingerloop braid for the skirt and prim.


Saturday 1 March 2014

New Pair of Breeches 2

Some of the more sharp eyed among my followers noted a difference between the breeches I made in the last post and the ones I photographed in the V&A. The legs on the originals are finished with a plain band whilst mine were tied with black tape.

Here is a close up of the end of one leg of the breeches in the museum. It is a plain band that encircles the leg and there is nowhere to put a tie if you wanted one. In fact there is no need as the breeches are cut to fit the leg below the knee. So had I got this one wrong? I needed to look at some more evidence.


 I wondered (as all the conventional wisdom I'd heard suggested that leg ties were used in the 1640s)s if looking at pictures might help solve the problem. I went to the 1640s Picturebook blog and clicked on the "breeches" tag to examine the pictures that had a decent image of the lower end of a pair. I took no notice of the status of the wearer, just the finishing of the breeches. If you are so minded, you can look for yourself by following this link. What I found was five basic types, examples of which I have copied below. As of time of writing there are 85 such images on the blog.

The first most numerous type is basic gathered legs with no visible ties or decoration. The type that is probably gathered into a small band. The example is from the English Improver Improved 1652. This type appears in 47% of the images.


The second most numerous is breeches legs ungathered but decorated in some way, usually with ribbon though buttons make an appearance occasionally. 25% of images in this case. This example from The School of Artificial Fireworks 1658.


Third on the list shows breeches legs tied around with tape or ribbon, where the tapes pass around the outside of the leg. In this case the breeches can be gathered by the tape, but the tape is not a part of the breeches. 13% of the sample. This picture is from Corpus  Sine Capite  Visibli 1642.


Just left ungathered, no decoration 8%. James Naylor's torture from 1656


And the final section where it just looks like there may be leg ties attached to the breeches, but I suspect from the weight of statistical evidence that the bows are more likely to be garters to keep the hose up. 7% Shepherd's Oracles 1645


I'm convinced now that leg ties were not used on 1640s breeches, nor were they actually necessary. What you did need though was something to tie round your hose to keep them up. This I believe is the origin of the leg ties seen worn by some reenactors of the period.

Sometimes however things move quickly in reenactment. This quote was pointed out to me today. It's from the National Archive and contains the toughest of George Wood from 1645 on the costings of suits to be made up for the standing army. The reference number is SP 28/33 f 443 

If the State allow 17 shillings for a cassock and a pair of breeches (that the two may be made according to the usual sizes formerly made for the furnishing of the several magazines I humble contrive it for quality and quality the two ought to be and worth in ready money, viz,

4 yards of Northern kersey at 3s and 6d per yard 
or proportionally 2 yards ¼, 1/16 1/32 of broadcloth at 6s 
1 yard ½ of lockram at 12d per yard 
1 pair of pockets at 3d
In tape for binding the cassock and knee strings 2d
In hooks and buttons for the breeches 1d
For making of the cassock and breeches total 17s

For the making of a cassock and a pair of breeches there will be requisite as follows according to the samples I have seen I humbly contrive them to be in quality and quantity and worth in read money

3 yards ½ of Northern kersey at 2s per yard is 7s
1 yard ½ of linen cloth or lining the breeches 9d
1 pair of leather pockets 3d
In tape for binding the cassock and knee strings 1 ½
In buttons and hooks for the breeches 1d
For making the cassock and breeches 10d


Thursday 6 February 2014

A New Pair of Breeches


The Oxford Army in 1643 were issued with suits, to include breeches and coats. I've made the coat, now here are the breeches, also newly modelled. Although there were no breeches found with the Colchester Museum coat to inspire this garment, I did go recently to see a pair of breeches in the Victoria and Albert Museum Clothworker's Centre that form part of a woollen suit, circa 1625-35 and I have used some of the aspects of those original breeches to help me work out a pattern and method of construction. The suit is made in a wool serge material which is hemmed unlike the Colchester Coat, and my breeches are in broadcloth which will hold a cut edge, so I have taken aspects from both garments to create my breeches. My photo of the V&A breeches is below. you can also look at the catalogue description by following this link


The serge breeches are actually made in 8 main pieces, my thought being that the original roll of fabric was too narrow to allow larger pieces of fabric. Luckily for me I had a nice roll of broadcloth so I could cut the main pieces out and make mine in four sections, which cuts down on the seams needed!

Once I had put the four pieces together in outer and linen lining, the next job was to insert the pockets. One thing that surprised me on examining the originals was that the pockets weren't inserted in the side seams, but had their own slits inserted. In fact the slits weren't actually finished off in any way, a worked bar holds the outside edges together at the bottom to stop ripping and the edges are just turned over and the pocket sewn in with running stitch. I tried to match this method with my pockets. The pocket lining in both cases in oilskin, or chamois leather. I've seen several references to suggest this was the case with breeches made for troops in the war. Here are the pockets; the lining in the V&A photo is missing, although there is one remaining liner out of the four pockets in the breeches. I've only inserted two pockets in mine, though it would be relatively easy to put in more even though the breeches are now finished.


Using the same method that I used for the collar of the soldier's coat, the waistband is just a length of folded cloth sewn directly to the gathered breeches. The lower edge of the waistband is the cut edge, there is no need to turn it under as it won't fray and will be subject to no wear. I used the same method for the lower leg bands. I decided against buttons closure at the top, mainly for practicality as my pikeman son seems to be able to lose buttons with regularity and I thought a leather tie through eyelets would work much better for him. Plus the V&A breeches were fitted with eyelets on both sides of the waistband. See photos below.


The fly (or codpiece) on the original breeches was just a folded strip sewn straight on to the front opening. It seemed crude to me, (in fact the original breeches are quite crudely put together in places), but as there is historical precedent, why not do the same for mine. I was tempted just to use a single layer of the broadcloth, but I got cold feet at the last moment and folded it once before sewing it on. My buttons are the same pewter ones I used for the coat. The original has some rather nice worked ones over wooden cores.


Nothing earth shattering here, just a few observations from having looked at original pieces of clothing. From a distance you probably won't be able to tell a pair of my breeches from anyone else's. however I have learned more from making this pair than any other pair of breeches up to now. The serge suit in the V&A was an inspiration, almost more than the posh doublets I've seen. I could never match the embroidery or buttonholes on the high class stuff. Looking at the Maldon Coat and this example made me think, "yes, I could do that."


Thursday 9 January 2014

A New Soldier's Coat


Last year I was lucky enough to visit the store rooms of Colchester Castle Museum and examine a coat in their collection. The coat was found in a chimney of a house in Maldon in Essex in the 1940s and although not precisely dated it is thought to be late 17th century in origin from the style of the cut. Whilst I wrote a report and took photos I was asked by the Museum staff not to blog my thoughts as Kate Gill had been given the job of conserving the coat and producing a report and a replica of the coat to be displayed in the museum. If you are interested, follow this link to Kate's website with some photos of the coat and replica. I am convinced that even if the coat isn't proveably from the 1640s, all the sewing techniques and the pattern used are spot on for a coat from the Civil War period.

So, in lieu of a report I have made my own coat using the construction methods of the original, but reducing the length and changing a few other small details to better represent the style and cut of soldiers coats from the English Civil War.

The original coat is made from closely woven wool, felted so that when you cut the fabric it will keep the edge without fraying and lined with a coarse linen fabric. Luckily there are still suppliers who can provide a decent, though not exact approximation to seventeenth century broadcloth. All the edges of the coat are left raw, the lining is turned under and the two layers sewn together with running or fore stitch.


It's not a modern method of tailoring, but it is seen in several 18th century coats as well as the Maldon coat and still used for Guardsmen's coats in the English Army. What is does do is make for cleaner lines and more accurate cutting as well as using less cloth because you don't need to add seam allowances and thus you can butt the pattern pieces together on the cloth when you are cutting out. The threads used to sew the original coat were a contrasting colour to the fabric used so I've used a brighter coloured linen thread, (dyed with rose madder from Mulberry Dyer) which makes the stitches visible, but also I believe more authentic.

In the photo above you can also see a worked bar of the same thread at the lower end of the side seam. There are three of these on the coat, one at each side and one at the back to reinforce the end of the seams and prevent ripping.


The cut of the coat is not exactly square, there is a noticeable waist and the coat flares out at the bottom. This copies the original but also mirrors coats that appear in woodcuts. The main body of the coat is in four pieces, the sleeves made from two pieces and slightly curved. I've not added cuffs or turn backs. Though the Maldon coat has cuffs, they are thought to be a later addition and a lot of soldier's coats have this kind of simple finishing to the sleeve. I also decided against shoulder wings, firstly because the original doesn't have them, but also because the woodcuts seem to indicate that wings only appear on coats that have turn-back cuffs.


The collar is a simple folded strip oversewn around the neck opening, the bottom edges again left raw. This is a common method in 18th century coats as well as the Maldon one, and makes perfect sense for the raw edges will not be subject to any wear.


The buttons are flat pewter shanked ones. The Maldon coat has wooden cores covered with knotted threads (turk's head) but I decided to use the pewter ones mainly for speed, but this kind of button turns up occasionally in archeological digs from the period and makes logical sense if you are making many coats quickly for an army issue, like the coats made in Oxford or Nantwich in 1643 for instance.


I secured the buttons by pushing the shank of each one through the outer wool layer and a strip of coarse canvas and then oversewing with a single thick linen thread. The museum one has a strip of linen behind the buttons to stiffen the front edge and also help secure the buttons. This ensures that each button sits nice and tight against the surface of the cloth and is quicker than sewing each one separately. You can also use a strip of leather if the shanks are big enough.


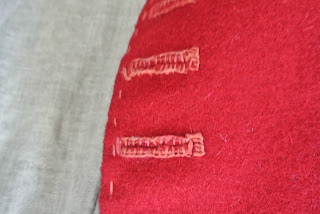
You will notice also that the buttonholes are quite open. Reassuringly the original buttonholes aren't anywhere near as fine as that on some posh doublets I've seen and making them more open means you spend about half the time you would normally on doing those annoying buttonholes!


Here's a view of the inside, showing the lining and the inside of the collar and buttonholes. The buttonholes aren't pretty from this side, but I think that's quite authentic judging by some I've seen, (including the Maldon coat). I didn't secure the sleeve head of the lining to the shell of the coat, but this was an option in tailoring of the period. Next time I will experiment with sewing the sleeves in as separate items after I've sewn the body and lining together, tacking the seam allowance of the body of the lining to the outer around the armhole, before whipping in the sleeve lining.


So some surprises here for anyone used to modern methods. Everything is very logical. Though it's made using techniques that are counter-intuitive if you have a sewing machine, for hand sewers it all makes perfect sense. The raw edges were a surprise at first and the very simple technique of sewing together with running stitch rather than neat hemming seemed unusual, but it works. The worked bars to secure the seams are logical and the loose buttonholes together with the method of securing the buttons also result in a garment which is quick and relatively easy to make. All that remains to be seen is if it will stand up the the rigours of my son wearing it in the pike block. Watch this space!